Preppy Kitchen Cinnamon Rolls: Perfect Classic Recipe Step-by-Step
There is something deeply satisfying about pulling a tray of warm, gooey cinnamon rolls out of the oven on a slow weekend morning. The smell alone, that rich blend of butter, brown sugar, and cinnamon baking into something golden and soft, is enough to bring everyone to the kitchen without a single announcement. The Preppy Kitchen approach to homemade cinnamon rolls has become one of the most trusted recipes in the home baking community, and for good reason. It balances approachability with bakery-quality results, making it ideal whether you are baking for a holiday breakfast, a weekend brunch, or simply because comfort food baking is what the day calls for.
This guide walks through every step of the process, from understanding what makes a great yeast dough to perfecting your cream cheese glaze, along with some lesser-known tips that most recipes skip over entirely.
What Makes Preppy Kitchen Cinnamon Rolls Different
Before diving into the how, it helps to understand the what. Preppy Kitchen cinnamon rolls are soft baked pastries made from an enriched yeast dough, rolled with a cinnamon sugar filling and finished with either a classic vanilla glaze or a tangy cream cheese frosting. What sets them apart from a generic easy cinnamon roll recipe is the attention to dough texture, the ratio of filling to bread, and the baking method.
The Preppy Kitchen style, much like the lifestyle it reflects, leans into quality, polish, and doing things properly without overcomplicating them. If you want to explore that philosophy beyond the kitchen, Preppyglow offers a great window into that world, covering everything from style to everyday living.
These are not thin, dry, or overly bready rolls. They are thick, pull-apart cinnamon rolls with a soft, pillowy crumb and a generous swirl of brown sugar cinnamon filling in every bite. The difference between a mediocre cinnamon roll and a bakery-style one almost always comes down to dough hydration, yeast health, and how long you let things rest.
Essential Ingredients for the Best Cinnamon Rolls
Getting the ingredients right is non-negotiable. Each one plays a specific role in building the structure, flavor, and texture of the final product.
What Goes Into the Dough
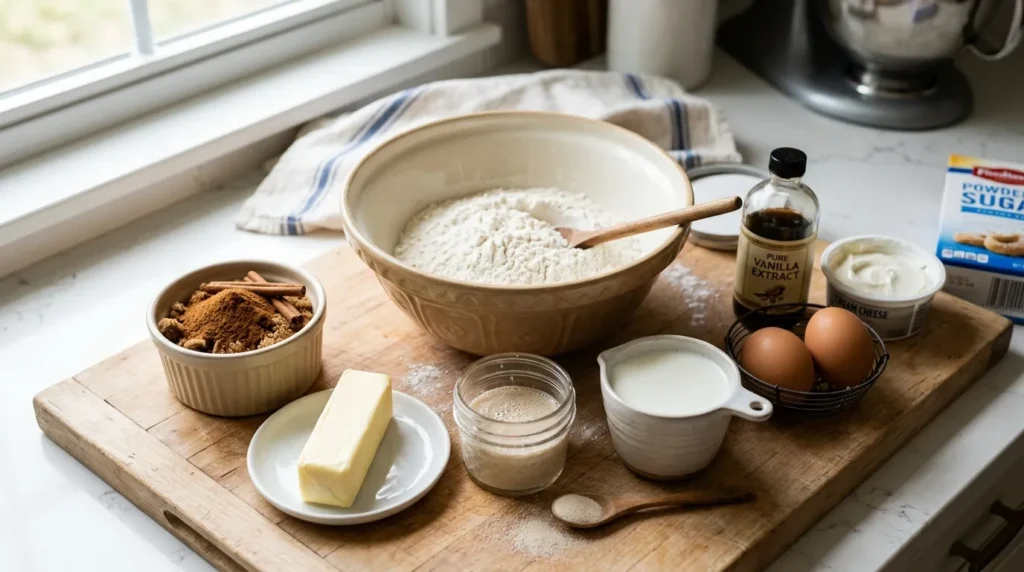
A proper buttery dough starts with all-purpose flour, which provides enough gluten structure to hold the rolls together without making them tough. Bread flour can be used for a slightly chewier roll, but all-purpose flour produces the classic soft dough recipe that most people associate with homemade cinnamon buns.
- Active dry yeast or instant yeast: The leavening agent that makes the dough rise. Active dry yeast should be proofed in warm milk (around 105 to 110°F) before mixing. Instant yeast can be mixed directly into the dry ingredients.
- Whole milk: Warmed milk adds richness and helps activate the yeast. Avoid overheating it; anything above 115°F kills the yeast.
- Eggs: Add structure, color, and a slight richness to the crumb.
- Butter: Softened unsalted butter is folded into the dough to create that tender, layered texture. Do not skip this.
- Sugar and salt: Sugar feeds the yeast and adds flavor; salt controls fermentation and brings balance.
The Cinnamon Sugar Filling
The cinnamon sugar mixture is where most of the flavor lives. A generous filling made with:
- Softened butter spread directly on the rolled dough
- Brown sugar packed firmly for deep, caramel-like sweetness
- Ground cinnamon, and sometimes a pinch of cardamom or nutmeg for warmth
The key is spreading the butter all the way to the edges, then covering it completely with the brown sugar cinnamon filling before rolling. Thin spots in the filling lead to bald bites with no flavor, so be thorough.
For the Glaze
Two finishes work beautifully here:
Vanilla glaze (simpler): Powdered sugar, milk, and vanilla extract whisked together into a pourable consistency. This sets slightly as it cools and gives a classic, sweet finish.
Cream cheese frosting (richer): Cream cheese, powdered sugar, vanilla extract, and a splash of milk beaten until smooth and spreadable. This is the version most people think of as the definitive cinnamon roll icing, and it adds a slight tang that cuts through the sweetness of the filling.
A Beginner’s Guide to Baking With Yeast
If you have avoided yeast dough recipes in the past, you are not alone. But once you understand what yeast actually does and what conditions it needs, beginner yeast recipes become far less intimidating.
Yeast is a living organism. It eats sugar and releases carbon dioxide, which causes the dough to expand and develop a light, airy crumb. The process requires warmth, moisture, and time. Here is what to keep in mind:
- Proofing the yeast: Combine active dry yeast with warm milk and a pinch of sugar. Within five to ten minutes, the mixture should become foamy. If it does not foam, the yeast is dead and needs to be replaced. Starting with dead yeast is the number one reason homemade cinnamon rolls fail.
- Kneading the dough: Kneading develops gluten, which gives the dough its structure and elasticity. A stand mixer with a dough hook makes this easier, but it can be done by hand in about eight to ten minutes. The dough is ready when it is smooth and springs back when poked.
- Dough rising tips: Place the dough in a lightly oiled bowl, cover it with plastic wrap or a clean towel, and let it rise in a warm, draft-free spot. An oven with just the light on is ideal. The dough should double in size in about one to one and a half hours.
One underappreciated trick: slightly underproofed dough actually produces better roll structure than overproofed dough. If the rolls look slightly smaller than expected before baking, that is usually fine. Overproofed rolls can collapse in the oven.
How to Roll and Cut Cinnamon Rolls the Right Way
This step is where most recipes give vague instructions, and where most bakers make avoidable mistakes.
Rolling the Dough
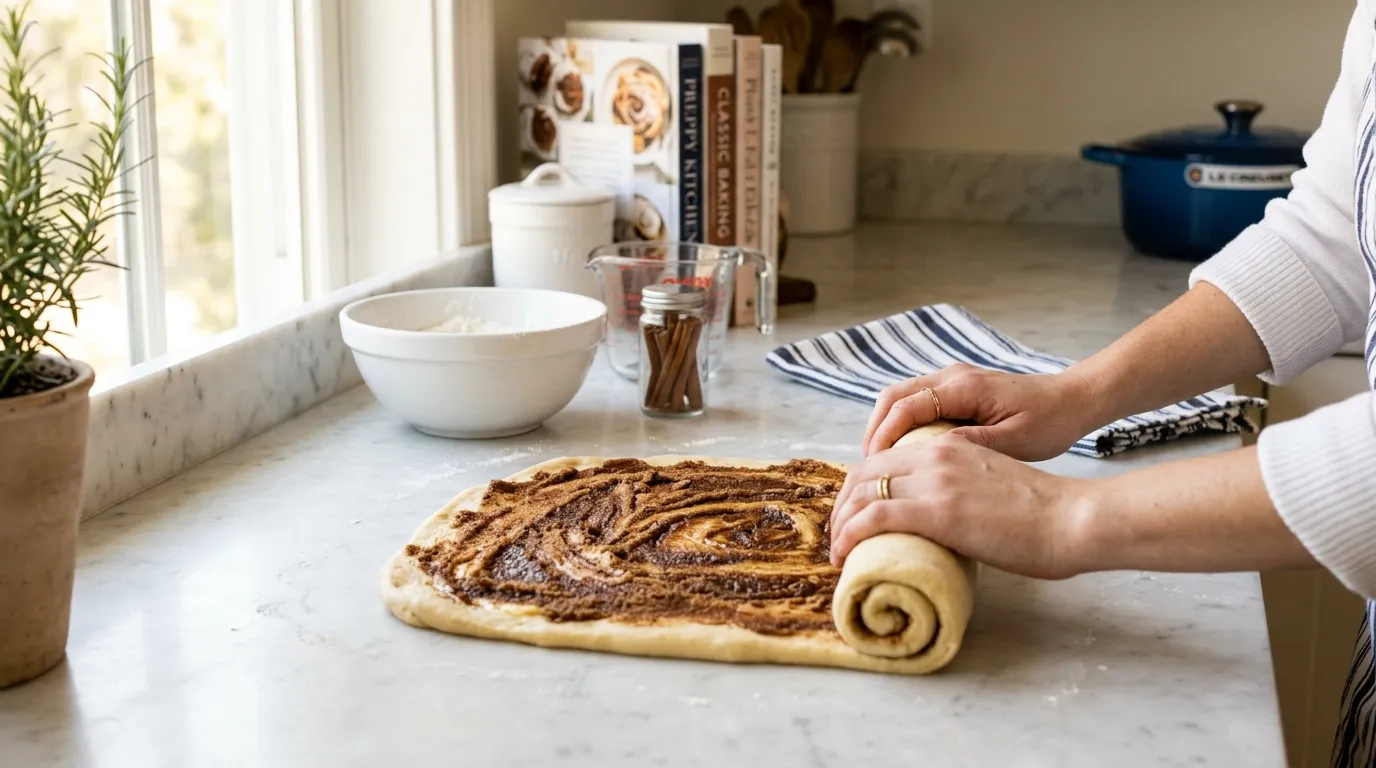
After the first rise, punch the dough down gently and turn it out onto a lightly floured surface. Roll it into a large rectangle, roughly 16 by 12 inches. Thickness matters here. Too thin and the rolls will be small and dense; too thick and the layers will not bake through properly. Aim for about a quarter-inch thickness.
The Best Way to Cut Cinnamon Rolls
Cutting with a sharp knife seems logical, but it compresses the roll and flattens the layers. Instead, use unflavored dental floss or a piece of thin kitchen twine. Slide it under the log, cross the ends over the top, and pull. The floss slices cleanly through without squishing the dough.
Cut the log into rolls about one and a half to two inches wide. This gives you rolls that are thick enough to stay soft and gooey in the center after baking.
Arrange them in a greased baking pan or a cast iron skillet with a little space between each one. As they proof for the second time, they will expand and touch each other, creating those soft, pull-apart edges that make homemade sweet rolls so irresistible.
Step-by-Step Instructions for Classic Cinnamon Rolls
This is the full process, from mixing the buttery dough to pulling fresh baked rolls out of the oven.
Making the Dough
- Warm the milk to between 105 and 110°F. Combine with yeast and a teaspoon of sugar. Let sit for 10 minutes until foamy.
- In a large bowl or stand mixer, combine flour, remaining sugar, and salt.
- Add the yeast mixture, eggs, and softened butter. Mix until a shaggy dough forms.
- Knead on medium speed for 7 to 8 minutes until the dough is smooth and slightly tacky but not sticky.
- Place in an oiled bowl, cover, and let rise for 1 to 1.5 hours until doubled.
Preparing the Filling
- Mix softened butter, brown sugar, and cinnamon in a small bowl until it forms a thick paste.
- Punch down the risen dough and roll it into a 16-by-12-inch rectangle on a floured surface.
- Spread the cinnamon sugar filling evenly across the entire surface, all the way to the edges.
- Starting from the long side, roll the dough into a tight log.
- Cut into 12 equal rolls using the dental floss method.
Baking
- Arrange rolls in a buttered 9-by-13-inch baking dish or a large cast iron skillet.
- Cover loosely and let rise for another 30 to 45 minutes.
- Bake at 350°F (175°C) for 22 to 28 minutes, until the tops are golden and the centers are set.
- Let cool for at least 10 minutes before adding the glaze.
Making the Glaze
Vanilla glaze: Whisk together 1.5 cups powdered sugar, 3 tablespoons milk, and 1 teaspoon vanilla extract until smooth. Pour over warm rolls.
Cream cheese frosting: Beat 4 ounces softened cream cheese with 1 cup powdered sugar, 2 tablespoons milk, and 1 teaspoon vanilla extract until fluffy. Spread generously over the rolls.
How to Make Overnight Cinnamon Rolls
Overnight cinnamon rolls are a game-changer for holiday breakfast ideas and weekend brunch planning. The concept is simple: you do all the prep work the night before and bake fresh in the morning.
After cutting the rolls and placing them in the baking dish, cover tightly with plastic wrap and refrigerate overnight rather than letting them do their second rise at room temperature. The cold slows the yeast activity but does not stop it. The dough does a slow, cold proof in the fridge over eight to twelve hours.
In the morning, take the pan out of the fridge and let it sit at room temperature for 30 to 45 minutes before baking. This allows the yeast to wake back up and the dough to puff slightly. Then bake as normal.
The benefit beyond convenience is actually flavor. The slow, cold fermentation develops a more complex taste in the dough, similar to what a long-fermented bread achieves. Many bakers find overnight cinnamon rolls taste noticeably better than same-day rolls.
Skillet Cinnamon Rolls: A Slightly Different Approach
Baking cinnamon rolls in a cast iron skillet is a technique that produces a slightly different result from a standard rectangular pan. The cast iron retains and distributes heat evenly, which means the bottoms and sides of the rolls get a deeper, more caramelized crust while the centers stay soft and gooey.
Skillet cinnamon rolls also look impressive straight from the oven. A 10 or 12-inch cast iron skillet fits about seven to eight rolls arranged in a circular pattern. They bake into each other beautifully and come out looking like something straight from a bakery window.
The technique is the same as a standard baked cinnamon roll recipe, just in a different vessel. Make sure to butter the skillet generously before adding the rolls, since the sugar in the filling can stick aggressively to an uncoated surface.
Comparing Methods: Pan vs. Skillet vs. Overnight
| Method | Texture | Crust | Prep Time | Best For |
|---|---|---|---|---|
| Standard baking pan | Soft, even | Light golden | 2.5 to 3 hours same-day | Everyday baking |
| Cast iron skillet | Gooey center, crispier edges | Deep golden brown | 2.5 to 3 hours | Brunch presentation |
| Overnight refrigerator proof | Richer flavor, very soft | Light golden | 20 min active + overnight | Holiday mornings, meal prep |
| Freezer method (unbaked) | Same as standard | Same as standard | Prep now, bake later | Batch baking |
Pro Tips for Fluffy, Bakery-Style Cinnamon Rolls
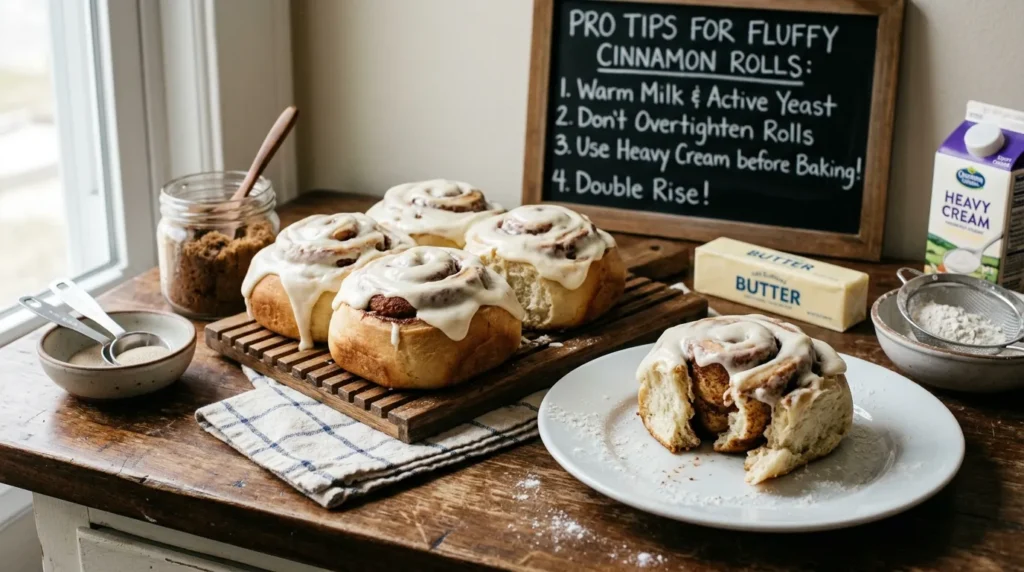
These are the details that take a good cinnamon roll recipe and make it great.
- Do not add too much flour. The dough should be slightly tacky. A sticky dough produces softer rolls. Adding excess flour in an attempt to make it easier to handle results in dense, dry bread rolls.
- Use room temperature butter and eggs. Cold ingredients slow down yeast activity and make the dough harder to bring together.
- Do not overbake. The most common mistake with sweet rolls is leaving them in too long. The centers should look barely set when you pull them out. They continue cooking from residual heat and firm up as they cool.
- Add glaze while warm, not hot. If the rolls are too hot, the glaze slides right off. Give them 10 minutes to cool slightly so it settles into the swirls.
- Brush with butter after baking. Before applying the glaze, brush the tops of the rolls with a little melted butter. This keeps them soft and adds another layer of flavor.
- Tent with foil if browning too fast. If the tops are darkening before the centers are done, lay a sheet of aluminum foil loosely over the pan.
Storing and Reheating Leftover Cinnamon Rolls
Fresh baked rolls are best within the first few hours, but they store and reheat well.
At room temperature: Store in an airtight container for up to two days. They will dry out slightly, so reheating is recommended.
Refrigerator: Store covered for up to five days. The cold can make the dough a bit firm, but reheating brings them back.
Freezer (baked): Once fully cooled, freeze individual rolls wrapped in plastic wrap and placed in a freezer bag for up to two months. Thaw overnight in the fridge.
Reheating: The microwave works in a pinch, about 20 to 25 seconds per roll with a damp paper towel on top to add moisture. For the best results, reheat in an oven at 300°F for 10 minutes. This brings back the fresh-baked texture far better than the microwave.
If you are exploring a preppy-inspired lifestyle beyond the kitchen, including home presentation and entertaining tips, Preppyglow is a great resource for bringing that same polish and intentionality into other areas of your life.
Lesser-Known Insights Most Recipes Do Not Tell You
A few things that experienced bakers know but rarely appear in beginner-facing recipes:
Brown butter in the filling: Swap regular melted butter for brown butter in your cinnamon sugar filling. The nutty, caramel-like flavor adds serious depth with almost no extra effort.
Tang zhong technique: Cooking a small portion of the flour and milk together into a paste before adding it to the dough produces exceptionally soft rolls that stay fresh longer. It is a method borrowed from Japanese milk bread baking and works beautifully in this context.
Vinegar or lemon juice in the glaze: Adding half a teaspoon of apple cider vinegar or lemon juice to a vanilla glaze keeps the sweetness from feeling one-dimensional and brightens the whole flavor.
Cinnamon quality matters: Cheap cinnamon is often stale or mildly flavored. Fresh, high-quality Ceylon cinnamon has a noticeably sweeter, more complex flavor than the average grocery store variety. If your cinnamon buns have always tasted a little flat, the cinnamon may be the culprit.
Frequently Asked Questions
Can I freeze cinnamon rolls before baking them?
Yes, and this is actually one of the best ways to prepare cinnamon rolls in advance. After cutting the rolls and placing them in the pan, cover tightly and freeze before the second rise. When ready to bake, transfer to the fridge the night before and then let them come to room temperature for 1 to 2 hours before baking as normal. The yeast will still be active and the rolls will puff up properly.
Why are my cinnamon rolls not fluffy?
There are a few common reasons. First, the yeast may have been dead or improperly activated. Always proof active dry yeast before using. Second, the dough may not have risen long enough. A warm, draft-free environment is essential for a good rise. Third, too much flour in the dough will produce a dense crumb. The dough should feel slightly tacky, not stiff. Finally, overbaking dries out the rolls and destroys that soft, pillowy texture.
What pairs well with homemade cinnamon rolls?
Classic pairings include freshly brewed coffee, a strong latte, or a glass of cold milk. For a more complete brunch spread, serve alongside scrambled eggs, fresh fruit, and orange juice. The richness of the cinnamon roll balances well with something acidic or savory on the side.
Can I make this recipe with gluten-free flour?
It is possible but requires some adjustments. A high-quality gluten-free all-purpose flour blend that contains xanthan gum will work best. The dough will behave differently as there is no gluten to develop, so it will be more like a thick batter. The texture of the baked rolls will be slightly denser and less chewy, but the flavor can still be excellent. Adding a bit of extra egg or an egg yolk helps with structure.
What is the difference between cinnamon rolls and cinnamon buns?
The terms are often used interchangeably, but there is a subtle distinction in baking culture. Cinnamon rolls typically refer to rolls made with an enriched yeast dough and topped with icing or frosting. Cinnamon buns, particularly in Scandinavian and Canadian traditions, often include cardamom in the dough and may be topped with pearl sugar instead of icing. Both are made from a similar base, but the flavor profile and finishing are slightly different. Preppy Kitchen cinnamon rolls fall firmly in the classic American style: soft, sweet, generously glazed.
How do I prevent the filling from leaking out during baking?
Two things help here. First, make sure the butter in the filling is softened but not melted. Melted butter is too liquid and runs out of the rolls as they bake. Second, roll the log tightly and seal the seam edge firmly by pinching it. Placing the rolls seam-side down in the pan also helps keep everything contained.
Can I make smaller or larger batches?
Absolutely. The recipe scales well. For a smaller batch, halve all ingredients and use an 8-by-8-inch pan. For a larger batch, double the recipe and use two pans or one large sheet pan. Keep baking times the same and check for doneness by pressing the center of a roll gently; it should feel set but not hard.