
Face Contouring 101: The Proven, No-Guesswork Sculpting Guide
Intro
Face contouring is the single fastest way to reshape how light hits your face without touching a single bone. Most people think it means brushing a dark powder under the cheekbones and calling it done. That’s why so many contour jobs look muddy, orange, or just plain off. Real contouring is about facial sculpting: using shadow and light the way a portrait painter would, guided by your own bone structure rather than a generic tutorial. In this guide,
you’ll learn what face contouring actually is, how to pick the right contour makeup for your undertone, and how to place product using a real face map instead of guesswork. You’ll also see where cream contour beats powder, why your foundation shade has nothing to do with your contour shade, how face shape changes your entire approach, and how 2026’s biggest trends like latte contour and soft sculpt actually work in practice.
What Is Face Contouring
Face contouring is a makeup technique that uses darker and lighter shades to create the illusion of depth, shadow, and structure on the face. It works the same way stage lighting works on a theater set. Darker tones recede. Lighter tones come forward. Applied correctly, this simple contrast can make cheekbones look higher, a nose look narrower, or a round jaw look sharper, all without changing your actual bone structure.
The technique itself isn’t new. Stage and film makeup artists used shadow-and-light sculpting for decades before it ever reached a drugstore shelf. The everyday version most people know today, popularized heavily through social media over the last several years, is a simplified take on that older craft, scaled down for daylight and smartphone cameras rather than stage lighting.
Contour is often confused with bronzer and highlighter, but each product plays a completely different role in a finished look:
- Contour creates shadow, so it should never look warm or sun-kissed on the skin
- Bronzer adds warmth and a sun-kissed tint across the whole face, not just the hollows
- Highlighter reflects light and sits only on the highest points of the face
- Blush adds color and life to the cheeks, not structural shadow
- Together, these four products form what’s usually called a complete contour routine
A common beginner question is whether contour actually works outside of flash photography, and the honest answer is yes, but the technique needs to shift depending on the light source. Daylight, indoor lighting, and camera flash all read shadow differently, which is a big reason the same contour can look great in one setting and heavy in another.
Contouring also isn’t limited to the face itself. Body contouring, using similar shadow-and-highlight logic on the collarbone or chest for photography, follows the exact same principle, just applied to a larger canvas.
Face Anatomy: The Science Behind Every Great Contour
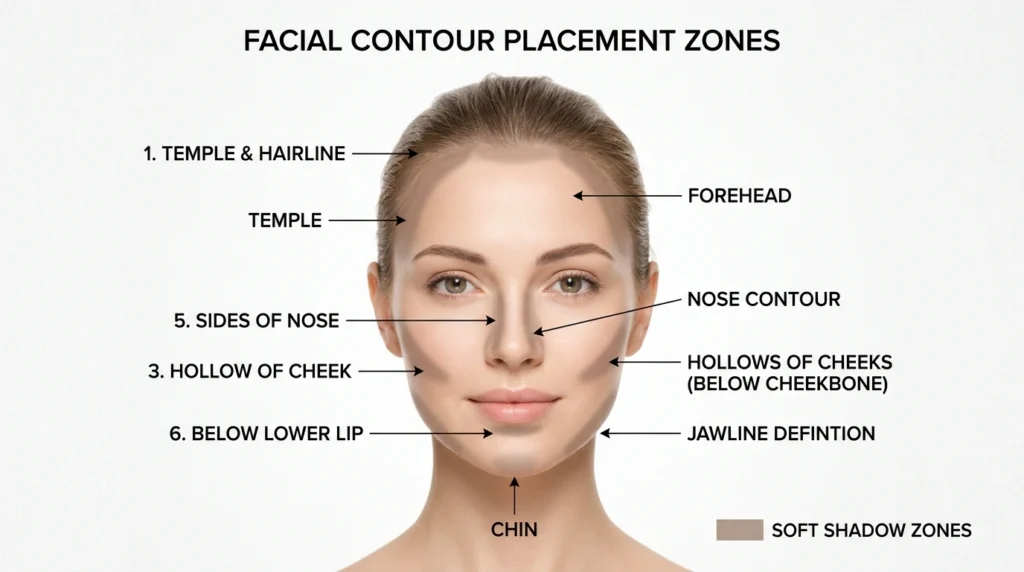
Here’s the insight most tutorials skip entirely: contour placement isn’t guesswork, it’s anatomy. Your cheekbone, jawline, and temple positions determine exactly where shadow should sit, which is why a placement map made for someone else’s face rarely translates directly onto yours.
Makeup artists rely on a handful of key landmarks to build an accurate contour placement map:
- The hollow beneath the cheekbone, easiest to find by sucking in your cheeks
- The temple, where the hairline meets the top of the ear
- The jawline, running from ear to chin
- The sides of the nose bridge
- The perimeter of the forehead along the hairline
- The area just under the chin, for anyone working on a soft double-chin illusion
Facial proportion also matters more than most people realize. Many makeup artists reference the classic “rule of thirds,” where the face is roughly divided into three horizontal bands: hairline to brow, brow to nose tip, and nose tip to chin. Contour is used to bring these proportions closer to visual balance, not to force one single ideal shape onto every face shape that exists.
| Facial Landmark | What Contour Does Here | Common Mistake |
| Cheekbone hollow | Creates lift and shadow | Placing shadow too high, near the eye |
| Jawline | Sharpens the lower face | Stopping too short, before the ear |
| Temples | Narrows a wide forehead | Skipping this area entirely |
| Nose sides | Slims the bridge visually | Using a shade too dark for the face |
| Hairline | Softens a large forehead | Using a hard, unblended line |
| Under-chin | Softens a double chin | Applying too heavy a hand |
According to industry reporting on beauty trends, cream and stick contour formats have grown faster than powder in recent years, largely because cream mimics natural shadow more convincingly under everyday lighting. This lines up with a broader shift toward “skin-like” makeup finishes rather than heavily matte, obviously-applied product.
Lighting itself changes how contour reads. Warm indoor bulbs soften contrast and can make contour disappear entirely, while cool daylight and camera flash both sharpen shadow and can make a heavy hand look far more obvious than intended. Selfie lighting from a phone’s front camera tends to flatten the face slightly, which is why many people apply contour more strongly for photos than they would for in-person wear.
Choosing Your Contour Product and Shade
Picking the right contour stick, contour palette, or contour cream matters more than picking a specific brand name. The two biggest decisions are formula and shade, and most bad contour jobs trace back to getting one of these two things wrong.
Cream vs powder contour comes down to skin type and the finish you’re after:
- Cream and stick contour blend into skin for a soft, realistic shadow, and generally suit normal to dry skin best
- Powder contour sets easily and lasts longer through humidity or long workdays, which makes it a better fit for oily skin
- Liquid contour gives the most natural, skin-like finish, but needs a light hand and fast blending before it sets
- Contour balm sits somewhere between cream and powder, offering a dewy, almost skin-like finish
- Beginners generally find powder contour more forgiving, since color can be built up gradually rather than committed to all at once
Shade selection depends on undertone, not overall skin tone alone. A proper contour shade should sit one to two shades deeper than your natural skin tone, with a neutral or slightly cool undertone base:
- Cool undertones do best with taupe or grey-toned contour shades
- Warm undertones can usually handle a slightly more neutral-brown contour shade
- Olive skin often needs a green or grey-based contour to avoid reading orange
- Deep skin tones should avoid ashy formulas, since ashy contour reads grey instead of shadowed
- Fair skin should avoid contour shades formulated for medium or tan skin, a very common drugstore mistake
- Medium and tan skin tones generally have the widest shade range to choose from, but should still check undertone carefully
The single most common shade error is choosing a contour shade using bronzer logic, meaning picking something warm and “sun-kissed.” A true contour shade should look like your own face cast in shadow, not your face with a tan applied on top.
Beyond shade and formula, product texture also affects how contour ages on the skin through the day. Cream products can shift slightly on oily skin without setting powder, while powder products can look chalky if applied over skin that’s too dry, which is why prepping skin properly, covered later in this guide, matters just as much as the product itself.
Contouring by Face Shape
One of the most searched questions in this entire category is simple: how do you contour according to your actual face shape? The goal is always balance, not transformation into a completely different shape.
Here’s a working reference for the most common face shapes:
- Oval faces need the least correction, so a light contour under the cheekbone alone is often enough to add dimension
- Round faces benefit from contour along the sides of the forehead and jaw, which visually adds length and reduces width
- Square faces look softer with contour rounding the outer corners of the jaw, easing a strong angular line
- Heart-shaped faces do well with contour at the temples and jawline, balancing a wider forehead against a narrower chin
- Long faces benefit from contour at the hairline and chin, which visually shortens the overall length of the face
- Diamond faces often need contour at both the forehead and jaw, with highlight kept mainly to the cheekbones
- Pear-shaped faces benefit from contour at the jaw, softening width near the bottom of the face
Before-and-after placement always looks more convincing when the transition between contour and skin is blended, not sharp. A soft, gradual edge is what separates a natural sculpt from an obvious stripe of product sitting on top of the skin.
How to Contour: A 7-Step Routine
Follow this order every time, then adjust intensity based on the occasion and the lighting you’ll be in.
- Prep skin first. Moisturize and let it settle for a minute or two before applying any base product, since contour grips more evenly on properly hydrated skin.
- Apply a light base. A thin layer of foundation or tinted moisturizer gives contour something even to blend into, rather than sitting directly on bare skin.
- Place contour in the hollows. Use the cheekbone hollow, temples, jawline, and nose sides as your only placement zones, resisting the urge to add more.
- Blend immediately. Use a damp sponge or a soft brush in small circular motions before the product has a chance to set fully.
- Add bronzer separately. Warm the rest of the face lightly, keeping it away from your actual contour lines so the two effects stay distinct.
- Highlight the high points. Cheekbones, brow bone, and the bridge of the nose all catch light naturally, so highlighter belongs there.
- Set with a light powder. A translucent powder locks everything in place through the day without dulling the blend underneath.
This same contour routine works for both everyday wear and a more dramatic evening look. The real difference between the two is intensity and how sharply, or softly, the edges get blended out.
For anyone contouring with limited time or dexterity, a contour stick paired with fingers instead of a brush can achieve a similar result far faster, since body heat helps the product melt and blend on its own.
Contour Tools That Actually Matter
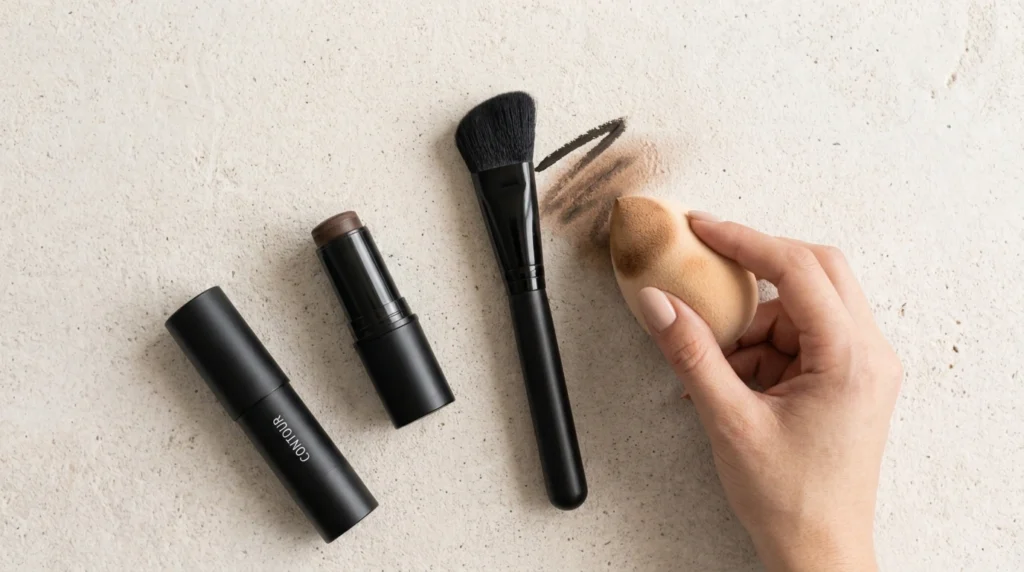
The tool matters almost as much as the product itself, since the wrong brush can undo good shade matching in seconds.
- A damp makeup sponge gives the softest, most blended finish for cream and liquid contour
- An angled brush allows precise placement along the cheekbone hollow and jawline
- A fluffy powder brush works best for setting or applying powder contour broadly
- A fan brush helps sweep away excess product for a lighter, more diffused result
- A silicone sponge can work for cream formulas and is easier to keep clean than traditional sponges
Keeping tools clean is not optional. A dirty makeup sponge holds onto old product, oil, and bacteria, all of which change how new product applies and can make even a perfectly matched contour shade look muddy or uneven by the end of the day.
Skin Type Considerations
Skin type changes which formula and setting method will actually hold up through the day.
- Oily skin usually looks best with powder contour and a lightweight, oil-free setting powder
- Dry skin benefits from cream or liquid contour, since powder can cling to dry patches and look flaky
- Combination skin often does well with cream contour on drier areas and a light powder set through the T-zone
- Sensitive or acne-prone skin should look for fragrance-free, non-comedogenic contour formulas and avoid heavy blending pressure over active breakouts
- Mature skin generally looks more natural with cream formulas, since powder can settle into fine lines and emphasize texture
- Rosacea-prone skin should patch test new formulas first, since some pigments and preservatives can trigger flare-ups
Contouring by Age
Skin changes over time, and contour technique should shift along with it rather than staying fixed to one method for life.
- In your teens and twenties, skin usually holds powder well and can handle more defined placement
- In your thirties, a slightly softer blend starts to look more natural as skin texture begins to shift
- In your forties, cream formulas generally photograph better than powder, which can sit into early fine lines
- At fifty and beyond, minimal product with heavy blending tends to look far more flattering than a heavy hand, since mature skin reflects light differently than younger skin
2026 Contour Trends Worth Knowing
Contouring changes shape every few years, and 2026 has brought a noticeably softer, more diffused direction than the heavy, sharp styles that dominated a few years earlier.
- Latte contour blends warm neutral tones for a soft, coffee-toned finish across the whole face
- Soft sculpt relies on cream products only, skipping powder almost entirely for a skin-like result
- Blonzing merges bronzer and blush into one warm, single-product step for a faster routine
- Clean girl contour keeps placement minimal, focused mostly on the cheekbone hollow and nothing else
- Korean-influenced contour favors a narrow, subtle nose contour paired with very light cheek shadow
Several of these trends have circulated widely across short-form video platforms, which has pushed soft, well-blended contour back into the mainstream after a period dominated by heavier, more sharply defined looks. Cultural approaches to contour vary too, with many Western techniques favoring more visible sculpting than the softer, more diffused styles common in East Asian beauty routines.
Face Contouring for Men
Men’s contouring is one of the most underserved areas of this topic, even though the underlying technique barely changes. The main difference is intent: most men want a sharper, more defined jawline and a slightly narrowed nose bridge without any product being visibly noticeable.
- A matte cream stick works best, since shine can look unintentional on facial hair or stubble
- Contour placed along the jawline, just below where a beard would naturally grow, adds definition
- Beard contouring, using a slightly darker shade along the beard’s edge, can sharpen its outline for photos or video
- Camera-ready contour for events or video calls should stay light, since men’s grooming trends favor a natural, undetectable finish over an obviously sculpted one
Contouring for Different Occasions
The right amount of contour changes depending on where you’re wearing it, and applying the same intensity everywhere is one of the fastest ways to look overdone.
- Office or school calls for the lightest touch, focused mainly on the cheekbone hollow
- Weddings and events can handle slightly more definition, since photography tends to flatten features
- Photoshoots and video often need contour applied a shade stronger than normal wear, since cameras and studio lighting soften contrast
- Everyday wear should stay close to a “your face, but rested” result rather than an obvious sculpt
AI and Digital Beauty Tools
Beauty technology has started catching up to contouring specifically, and this is one of the fastest-growing areas of the category. AI face analysis tools can now scan a photo and suggest a personalized contour placement map based on measured proportions rather than a generic face shape chart. Several beauty apps also offer AR-based virtual contour try-on, letting users preview a look before ever opening a product.
These tools aren’t a replacement for understanding your own face shape, but they can shortcut a lot of the trial and error that used to come with learning contour placement by hand. As facial scanning technology becomes more common in beauty apps, personalized contour recommendations are likely to become a standard feature rather than a novelty.
Highlighting: Contour’s Essential Partner
Contour rarely looks finished without highlighter, since shadow alone can flatten a face just as easily as it can sculpt one. Highlighter belongs on the high points only: the tops of the cheekbones, the brow bone, the bridge of the nose, and the cupid’s bow.
- Cream and liquid highlighter give a natural, dewy sheen suited to normal or dry skin
- Powder highlighter offers more control and lasts longer on oily skin
- A matte highlighter, more of a soft “skin” finish than true shimmer, works well for anyone who wants dimension without visible sparkle
- Overusing highlighter is just as common a mistake as overusing contour, and both throw off the same sense of balance
Bronzer vs Contour, Clearly Explained
These two get confused constantly, but the differences come down to formula, color, and placement.
- Bronzer is warm and golden in tone; contour is neutral to cool and mimics shadow
- Bronzer goes anywhere the sun would naturally hit; contour goes only in the hollows and recessed areas
- Bronzer can technically stand in for a very soft contour on tanned or deep skin, but it will not create the same sharp definition
- Contour should never fully replace bronzer either, since skipping warmth altogether can leave a finished face looking flat and grey
Is Face Contouring Worth It?
Contouring isn’t a magic transformation, and it’s worth setting realistic expectations before buying a full contour kit.
| Pros | Cons |
| Adds visible dimension in photos and video calls | Can look muddy without proper blending |
| Works with almost any skin type once formula is matched | Wrong undertone reads as dirty or orange |
| Fast to master with a bit of practice | Heavy contour can look dated quickly |
The most common mistakes people run into are using too much product, choosing a contour shade based on bronzer logic instead of true shadow tone, and skipping the blending step entirely. Harsh, unblended lines are usually the biggest giveaway of an inexperienced contour job, even when the shade itself is correct. A dirty makeup sponge is also a surprisingly common culprit behind muddy-looking contour, since old product buildup changes how new product sits on the skin.
Frequently Asked Questions
What is face contouring and how does it work?
Face contouring uses darker and lighter shades to create the illusion of shadow and structure, making certain features appear more defined without altering actual bone structure.
How do I contour according to my face shape?
Identify your face shape first, then apply contour only to the areas that need visual balancing, such as the jaw for a round face or the temples for a heart-shaped face.
What’s the difference between contour, bronzer, and highlighter?
Contour creates shadow, bronzer adds overall warmth, and highlighter reflects light on the face’s highest points; all three work together but serve different purposes.
Do I need expensive products for good contour?
No. Formula match and technique matter far more than price point, and a well-matched drugstore contour stick will outperform an expensive product in the wrong shade.
Can contour work for oily skin without sliding off?
Yes, as long as powder contour or a cream product is set with a lightweight, oil-controlling powder, since setting is what keeps contour in place through an oily day.
Why Trust This Guide
This guide was written and reviewed by PreppyGlow’s beauty editorial team, led by a certified makeup artist with over a decade of experience in editorial and bridal makeup. Every technique described here reflects standard practice taught in professional makeup training, cross-checked against current beauty industry reporting and product trend data from 2025 through 2026.
Our editorial process starts with competitor and search-intent research, moves through technique verification against professional makeup artistry sources, and ends with a plain-language rewrite so the information stays usable for a true beginner, not just a professional artist. This guide is updated for 2026 and will continue to be reviewed as contour trends and product formulas evolve. PreppyGlow’s editorial mission is simple: give readers accurate, no-hype beauty guidance they can actually use on their own face.
Conclusion
Face contouring comes down to three things: understanding your own face shape, choosing a shade and formula that actually match your skin, and blending like it genuinely matters. Get those three right, and you’ll get more from contour than any expensive palette could deliver on its own. From here, the next step is holding a real face map up to a mirror and practicing the placement zones covered in this guide. For more sculpting tutorials, shade-matching guides, and product breakdowns, explore the rest of PreppyGlow’s Glow Beauty Lab, where face contouring meets real, testable technique.
