
Preppy Kitchen Cheesecake: Classic New York Cheesecake Made Easy
There is something deeply satisfying about pulling a perfectly set, crack-free cheesecake out of the oven. Not everyone gets it right on the first try, but once you understand the logic behind each step, the whole process clicks into place. The Preppy Kitchen cheesecake recipe has become one of the most searched and trusted approaches to making a classic baked cheesecake at home, and for good reason. It cuts through the intimidation factor without cutting corners on flavor or texture.
If you have ever wondered what separates a dense, bakery-style cheesecake from the rubbery, grainy versions that disappoints at potlucks, this guide will answer every question you did not know you had.
What “Preppy Kitchen Cheesecake” Actually Means
The term “Preppy Kitchen” refers to the culinary content brand built around approachable, beautifully presented recipes, particularly baked desserts. The Preppy Kitchen aesthetic borrows heavily from a polished, clean sensibility, where classic American recipes are refined without being complicated. For a deeper look at that lifestyle and aesthetic sensibility, Preppyglow covers the preppy world in detail.
In the context of cheesecake, “Preppy Kitchen cheesecake” has become shorthand for a specific style of homemade cheesecake that prioritizes smooth cream cheese filling, a buttery graham crust, and reliable baking techniques that eliminate the common pitfalls like cracking, sunken centers, or uneven texture.
This is not a no-bake recipe. It is a proper oven-baked cheesecake, specifically modeled on the New York cheesecake tradition, which is known for its dense texture, rich flavor, and minimal additional ingredients beyond cream cheese, eggs, sugar, sour cream, and vanilla extract.
Everything You Need to Make This Recipe
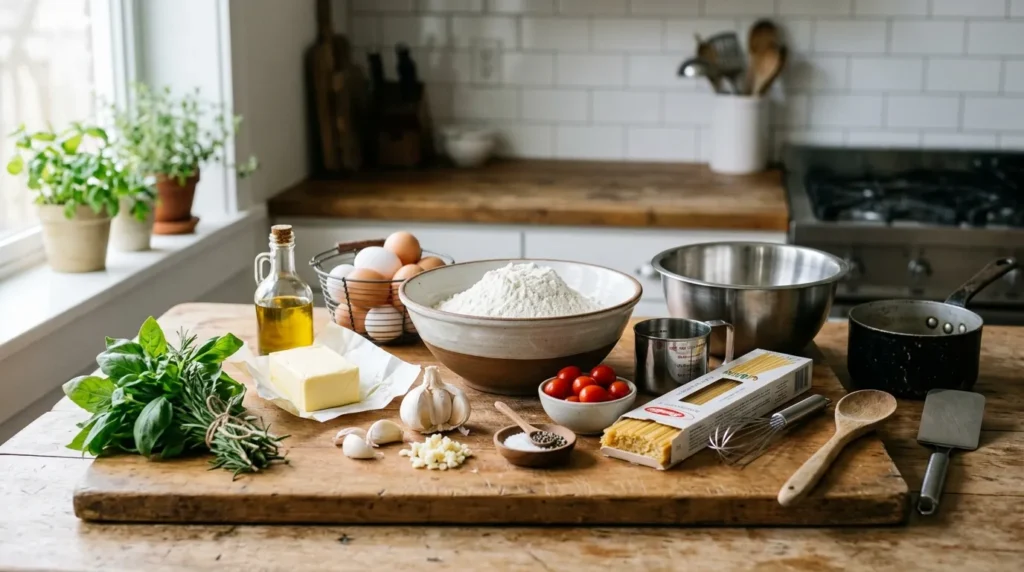
Before anything touches a bowl, it helps to understand exactly what goes into a great cheesecake and why each component matters.
Crust Ingredients
The foundation of any good cheesecake is the graham cracker crust. Here is what you need:
- Graham crackers (about 1.5 cups of crumbs): The backbone of the crust. The natural honey-sweetness of graham crackers pairs perfectly with the tangy filling.
- Unsalted butter (around 5 tablespoons, melted): Binds the crumbs together and adds richness. Always use unsalted so you can control the salt level.
- Granulated sugar (2 tablespoons): Adds a hint of sweetness and helps the crust set firm.
Filling Ingredients
- Cream cheese (32 oz, full-fat, room temperature): The non-negotiable centerpiece.
- Granulated sugar (1.25 cups): Sweetens the filling and contributes to the smooth, creamy texture.
- Sour cream (1 cup, room temperature): This is the ingredient most home bakers skip, and it is a mistake. Sour cream adds a gentle tang and contributes to that signature silky consistency.
- Eggs (4 large, room temperature): Provide structure. Cold eggs can cause the batter to break.
- Vanilla extract (2 teaspoons, pure): Adds depth without overpowering. Real vanilla, not imitation, makes a noticeable difference.
What Is the Best Cream Cheese to Choose?
This question comes up constantly. The short answer is full-fat block cream cheese, not whipped, not low-fat, not spreadable. Philadelphia Cream Cheese is the industry benchmark for a reason. It has the right fat content, the right moisture level, and the right density to produce that classic dense cheesecake texture home bakers are after.
Generic store-brand block cream cheese can work, but the texture of the final product may vary slightly. Whipped or spreadable varieties contain more air and water, which translates to a looser, less stable filling that tends to crack more easily and lacks the rich flavor of the full-fat version.
Whatever brand you choose, let the cream cheese sit at room temperature for at least one hour before mixing. Cold cream cheese does not blend smoothly, and those small lumps never fully disappear, no matter how long you beat the batter.
How to Make the Best Cheesecake at Home
The process is straightforward, but the order of operations matters more than most recipes let on.
Building the Graham Cracker Crust
Start by crushing your graham crackers into fine, even crumbs. A food processor makes this effortless, but a zip-lock bag and a rolling pin work just as well. The crumbs should feel like coarse sand, not chunky pieces.
Mix the crumbs with melted butter and sugar until every crumb is coated. Press the mixture firmly into the bottom and slightly up the sides of your springform pan. The keyword here is firmly. Use the bottom of a flat measuring cup to compact the crust evenly. A loose crust will crumble when you slice the cheesecake.
Bake the crust alone at 325°F for about 10 minutes. This pre-bake step is often skipped in beginner recipes, but it serves an important purpose: it sets the crust so it holds together when the filling is poured in and does not turn soggy during the long bake.
Let the crust cool completely before adding the filling.
Preparing the Smooth Cream Cheese Filling
In a large bowl, beat the room-temperature cream cheese on medium speed until it is completely smooth, about 2 to 3 minutes. Scrape down the sides of the bowl multiple times. Any unmixed cream cheese hiding on the walls of the bowl will show up as lumps in your final cheesecake.
Add the sugar and beat again until incorporated. Then add the sour cream and vanilla extract, mixing just until combined. This is where many home bakers overbeat, and it is one of the primary causes of a cracked cheesecake. More on that below.
Add the eggs one at a time, mixing on low speed after each addition. Low speed is critical here. Beating eggs at high speed incorporates air into the batter, and that trapped air expands in the oven, rises up through the surface, then collapses as the cheesecake cools, leaving cracks and a sunken center.
Pour the filling over the cooled crust and smooth the top with a spatula.
How to Stop Your Cheesecake From Cracking
Cracking is the single biggest fear in cheesecake baking, and it is almost entirely preventable once you understand the causes.
The four main causes of cheesecake cracks:
- Overmixing after eggs are added. Air incorporated during mixing expands in the oven and cracks the surface as the cheesecake cools.
- Overbaking. A properly baked cheesecake should still jiggle slightly in the center when you remove it from the oven. That residual heat will finish the job.
- Rapid temperature change. Pulling a hot cheesecake directly into a cool kitchen causes the surface to tighten and crack. Leave it in the oven with the door propped slightly open for an hour after baking.
- Cold ingredients. Cold cream cheese and cold eggs both contribute to uneven mixing and uneven baking.
There is a simple test: when the baking time is up, open the oven and gently shake the pan. The edges should be set, but a 2 to 3 inch circle in the center should wobble like set gelatin, not slosh like liquid. If the entire surface moves like water, it needs more time. If there is no movement at all, it is already overbaked.
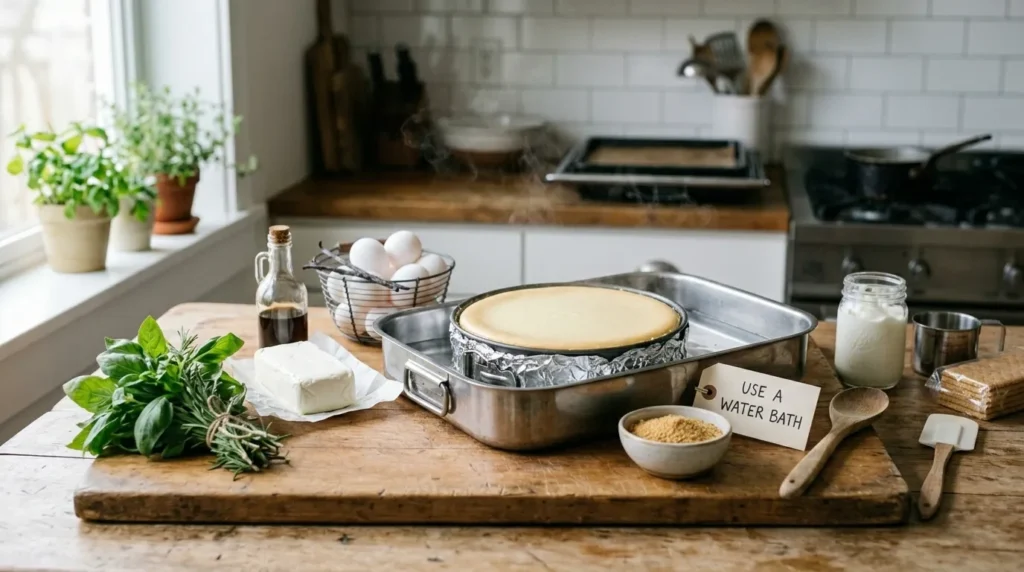
Why You Do Not Need a Water Bath for This Recipe
The water bath, or bain-marie, is often presented as a requirement for any serious cheesecake. The argument is that surrounding the pan with hot water keeps the oven environment moist, slows the baking process, and prevents the top from drying out and cracking.
That argument has merit. But it also adds significant complexity and introduces new failure points: water seeping into the springform pan, condensation on the surface, uneven temperatures.
The Preppy Kitchen approach sidesteps the water bath entirely by using a different strategy. A shallow pan of hot water is placed on the rack below the cheesecake, not around it. This creates steam in the oven without the risk of water infiltration. Combined with a lower baking temperature and the gradual cooling method described above, the results are virtually indistinguishable from a water-bath cheesecake.
This makes the recipe genuinely accessible to cheesecake beginners who have been scared off by water bath requirements. It is also faster to set up and clean up.
Why the Springform Pan Is Non-Negotiable
A springform pan is the only vessel that makes sense for a cheesecake. The removable sides allow you to release the cheesecake without flipping it or cutting around the edges, both of which would destroy the presentation.
Use a 9-inch springform pan for this recipe. A 10-inch pan will produce a slightly thinner cheesecake that bakes faster, so adjust your baking time accordingly. A pan smaller than 9 inches will cause the filling to overflow.
Before use, line the bottom of the pan with a circle of parchment paper. This makes it easy to slide the cheesecake off the base and onto a serving plate. Lightly grease the sides with butter or cooking spray to prevent the filling from sticking and pulling away from the edges as it bakes.
If your springform pan is older or has a worn seal, wrap the outside of the bottom with a double layer of heavy-duty aluminum foil before baking. This prevents any butter from the crust from leaking onto the oven floor.
Topping and Serving Ideas for Your Homemade Cheesecake
A classic New York cheesecake is perfectly complete on its own, served cold with clean, sharp slices. But toppings take it from everyday dessert to showstopper.
Popular topping options:
- Strawberry Sauce: Fresh or frozen strawberries cooked down with sugar and a squeeze of lemon juice. Spoon it over individual slices rather than the whole cheesecake to keep the presentation clean.
- Blueberry Sauce: Similar process to strawberry sauce. The deep purple color contrasts beautifully against the white cheesecake filling.
- Whipped Cream: A simple classic. Pipe rosettes around the edge for a professional bakery-style cheesecake look.
- Chocolate Ganache: Heavy cream heated and poured over chopped dark chocolate, then drizzled over the top in a thin layer. Let it set before slicing.
- Fresh fruit: Sliced strawberries, raspberries, or a mix of berries arranged on top just before serving adds color and freshness without overpowering the cheesecake flavor.
For a plain cheesecake that doubles as a party dessert or holiday cheesecake centerpiece, a dusting of powdered sugar and a ring of fresh fruit is all it needs.
If you enjoy exploring different recipe styles with the same clean aesthetic, the Preppy Kitchen approach to other baked goods follows similar principles. The preppy kitchen carrot cake, for instance, applies the same logic of building deep flavor through careful layering of ingredients, and the preppy kitchen sugar cookies bring that same precision to cutout baking with consistent results that hold their shape.
Comparison: New York Cheesecake vs. Other Cheesecake Styles
Understanding where this recipe sits in the broader cheesecake landscape helps explain why specific techniques are used.
| Feature | New York Cheesecake | No-Bake Cheesecake | Japanese Cheesecake | Italian Ricotta Cheesecake |
|---|---|---|---|---|
| Base ingredient | Philadelphia Cream Cheese | Cream cheese + gelatin | Cream cheese + egg whites | Ricotta cheese |
| Texture | Dense, rich, smooth | Light, mousse-like | Fluffy, jiggly | Grainy, rustic |
| Baking required | Yes | No | Yes | Yes |
| Crust type | Graham cracker crust | Graham cracker or Oreo | No crust or light sponge | Pastry crust |
| Water bath | Optional | N/A | Required | Recommended |
| Topping style | Fruit sauce, plain | Fresh fruit, chocolate | Powdered sugar | Citrus zest, fruit |
| Difficulty level | Moderate | Easy | Advanced | Moderate |
| Best occasion | Dinner parties, holidays | Weeknight dessert | Special events | Italian feasts |
The New York cheesecake style, which is the foundation of this recipe, wins on richness and satisfaction. It is the version most people picture when they think “cheesecake” and the one that holds its shape beautifully for dessert presentation and cheesecake slices served at the table.
How to Store Cheesecake Properly
Cheesecake is a chilled dessert and needs proper storage to maintain its texture and flavor.
Refrigerator storage: Once the cheesecake has cooled completely and chilled in the refrigerator for at least 4 hours (overnight is better), cover it loosely with plastic wrap or store it in an airtight container. It keeps well for up to 5 days. Do not cover a warm cheesecake; the condensation will make the surface wet.
Freezer storage: Cheesecake freezes exceptionally well. Slice it first, place individual slices on a parchment-lined baking sheet, and freeze until solid. Then wrap each slice in plastic wrap and store in a freezer-safe bag for up to 2 months. Thaw slices overnight in the refrigerator.
Serving tip: Cheesecake slices more cleanly when the cheesecake is cold and the knife is hot. Dip a sharp knife in hot water, wipe it dry, and slice. Repeat between cuts.
Pro-Level Tips for Getting This Recipe Right Every Time
These are the details that separate good cheesecakes from genuinely great ones.
- Room temperature is everything. Cream cheese, eggs, and sour cream all need to be at room temperature before you begin. If you forgot to pull them out in advance, set the cream cheese in a bowl of warm water for 15 minutes and place the eggs in warm water for 5 minutes.
- Do not skip the pre-bake on the crust. An unbaked crust turns soggy and loose. Ten minutes in the oven makes a significant difference in texture and structural integrity.
- Scrape the bowl constantly. When making the smooth cream cheese filling, scrape down the sides of the bowl at every stage. The paddle attachment of a stand mixer pushes cream cheese up the sides where it sits unmixed.
- Beat the eggs in last, on low. This is the most important tip for cheesecake without cracks. Low speed, one egg at a time, only until each egg disappears into the batter.
- Do not open the oven during baking. Temperature fluctuations mid-bake are a direct cause of cracking. Resist the urge to peek until the minimum bake time has elapsed.
- Cool gradually. After baking, turn off the oven, prop the door open a few inches, and leave the cheesecake inside for one full hour before moving it to the counter. Then refrigerate for at least 4 hours. Overnight is ideal for the cleanest texture and the best flavor development.
- Use a rimmed baking sheet under the springform pan. This catches any butter drips from the crust and makes it easier to move the pan in and out of the oven.
Full Recipe: Preppy Kitchen Style New York Cheesecake
Crust Ingredients
- 1.5 cups (180g) graham cracker crumbs
- 5 tablespoons (70g) unsalted butter, melted
- 2 tablespoons (25g) granulated sugar
- Pinch of salt
Filling Ingredients
- 32 oz (900g) full-fat block cream cheese, room temperature
- 1.25 cups (250g) granulated sugar
- 1 cup (240g) full-fat sour cream, room temperature
- 4 large eggs, room temperature
- 2 teaspoons pure vanilla extract
- 1 tablespoon all-purpose flour (optional, adds a little structure)
Instructions: Crust
- Preheat oven to 325°F (163°C). Grease a 9-inch springform pan and line the bottom with parchment.
- Combine graham cracker crumbs, melted butter, sugar, and salt. Mix until the crumbs are evenly moistened.
- Press firmly into the bottom of the prepared pan, extending slightly up the sides.
- Bake for 10 minutes. Remove and let cool while you prepare the filling.
Instructions: Filling
- Beat room-temperature cream cheese on medium speed until completely smooth, about 2 to 3 minutes. Scrape bowl thoroughly.
- Add sugar and beat until incorporated. Add sour cream and vanilla extract, mixing on low until combined.
- Add eggs one at a time, beating on low speed just until each egg is incorporated. Do not overmix.
- Pour the filling over the cooled crust. Smooth the top.
- Place a shallow pan of hot water on the oven rack below the cheesecake.
- Bake at 325°F for 55 to 65 minutes, until edges are set and center wobbles slightly.
- Turn off the oven, prop the door open, and leave cheesecake inside for 1 hour.
- Transfer to a wire rack and cool to room temperature, then refrigerate for at least 4 hours or overnight.
Recipe Notes
- Do not substitute whipped or low-fat cream cheese.
- All dairy and eggs must be at room temperature before mixing.
- The wobble test is more reliable than the timer. A 2 to 3 inch jiggle in the center means it is done.
- For a sour cream cheesecake topping, mix 1 cup sour cream with 2 tablespoons sugar and 1 teaspoon vanilla. Spread over the still-warm cheesecake and return to the oven for 10 minutes.
Frequently Asked Questions
Can I make this cheesecake without a springform pan?
Technically, you can bake it in a deep cake pan lined generously with parchment, but removing it cleanly is very difficult. A springform pan is the standard tool for this type of oven-baked cheesecake, and it is worth the investment. The results are dramatically easier to achieve.
Why is my cheesecake filling lumpy?
Almost always, lumpy cheesecake filling comes from cream cheese that was not fully at room temperature before beating. Cold cream cheese does not blend smoothly no matter how long you mix it. Let it sit out for at least an hour, and beat it alone until completely smooth before adding anything else.
Do I really need sour cream in the filling?
Sour cream is not just for tang. It contributes to the creamy texture and actually helps the filling bake more evenly. Skipping it produces a denser, slightly less smooth cheesecake. If you do not have sour cream, full-fat Greek yogurt is the best substitute.
How far in advance can I make this cheesecake?
This easy cheesecake recipe is an ideal make-ahead dessert. It can be made two to three days in advance and stored in the refrigerator. The flavor actually deepens and improves after 24 hours of chilling, which makes it a perfect choice as a holiday cheesecake or party dessert that you prepare the day before.
Can I add flavor variations to the filling?
Absolutely. Lemon zest and a tablespoon of fresh lemon juice adds a bright, citrusy dimension. For a chocolate swirl, melt 3 oz of dark chocolate and drizzle it over the filling before baking, then swirl with a toothpick. Espresso powder dissolved in vanilla extract adds a mocha depth. The base recipe is a reliable canvas for creative dessert recipe variations.
Why does my cheesecake sink in the middle after cooling?
A slightly sunken center usually means the cheesecake was overbaked or cooled too quickly. Remember, a small jiggle in the center when pulled from the oven is correct. That center finishes cooking from residual heat. Rapid cooling, like moving the cheesecake directly from the oven to a cold refrigerator, also causes the surface to sink as trapped steam collapses.
What is the difference between this and a no-bake cheesecake?
A no-bake cheesecake relies on gelatin or whipped cream for structure rather than eggs and oven heat. The result is a lighter, fluffier, mousse-like texture. This baked cheesecake produces the dense, smooth, rich filling that defines the classic dessert. Both are valid, but they are genuinely different experiences. For a dinner party or a holiday table, a baked New York cheesecake carries more presence and depth.
Whether you are tackling this recipe as a cheesecake beginner or revisiting it after a few disappointing attempts, the logic behind every step in this guide is designed to be practical and repeatable. A great cheesecake is not about talent. It is about temperature, patience, and not overmixing the eggs. Get those three things right, and the result will rival anything from a professional bakery.