
Glow Beauty Lab: The Complete Guide to Makeup, Tools & Pro Beauty
Welcome to Glow Beauty Lab, the makeup, tools and pro beauty techniques hub built for real faces, not just tutorial lighting. Most beauty content picks one product and stops there. Glow Beauty Lab is different — it connects the dots between your skin type, your face shape, your tools, and the techniques professionals actually use, so every product choice makes sense together instead of in isolation.
At its core, Glow Beauty Lab is a resource for building a makeup routine that’s matched to your undertone, your skin, and your skill level, using the same logic estheticians and makeup artists rely on daily. You’ll find guidance on foundation matching, contour placement, eye makeup techniques, and the beauty tools — from brushes to at-home devices — that make a visible difference.
Whether you’re building your first kit or refining a decade-old routine, this guide walks through what actually matters, step by step, in plain language.
What Is Glow Beauty Lab?
Glow Beauty Lab is a content pillar covering everything related to makeup, tools and pro beauty techniques — the practical, skill-based side of beauty, as opposed to trend coverage or product reviews alone. It exists to answer one core question: how do you get professional-looking results with an everyday routine?
That means covering topics like:
- How to match foundation to your undertone and skin type
- How to place contour, blush and highlighter based on face shape
- How to build confident eye and lip techniques, including for monolid and hooded eyes
- Which tools (brushes, gua sha, LED devices) are worth owning
- How to build a full makeup collection without overspending
- How to remove makeup properly without damaging your skin barrier
What most people expect to find here:
- Step-by-step technique breakdowns, not just product lists
- Guidance that adjusts for skin type and face shape
- Honest comparisons between tools and methods (extensions vs. false lashes, gua sha vs. jade roller)
- Beginner-friendly explanations without skipping the “why”
- Content that holds up under real, daily-wear conditions
The goal isn’t to sell a look. It’s to teach the underlying skill so you can adapt it to any look.
That distinction matters more than it sounds. A trend-based tutorial teaches you one specific result on one specific face. A technique-based guide teaches you why that result worked, so you can recreate the same logic on your own bone structure, skin texture and skill level — even when the trend changes next season. Glow Beauty Lab is built around that second approach on purpose, because it’s the version of beauty content that keeps working long after a single tutorial goes out of style.
Makeup Techniques That Define Pro-Level Results
Here’s a fact most beginners don’t hear early enough: technique outperforms product price almost every time. A $12 foundation applied with the right tool and the right undertone match will look better than a $60 foundation applied without either.
Three techniques do the heaviest lifting in any routine:
1. Undertone matching. Warm, cool and neutral undertones determine whether a “correct” shade reads as flattering or off. A quick vein check (green veins = warm, blue/purple veins = cool) is a fast starting point before testing product on the jawline in natural light.
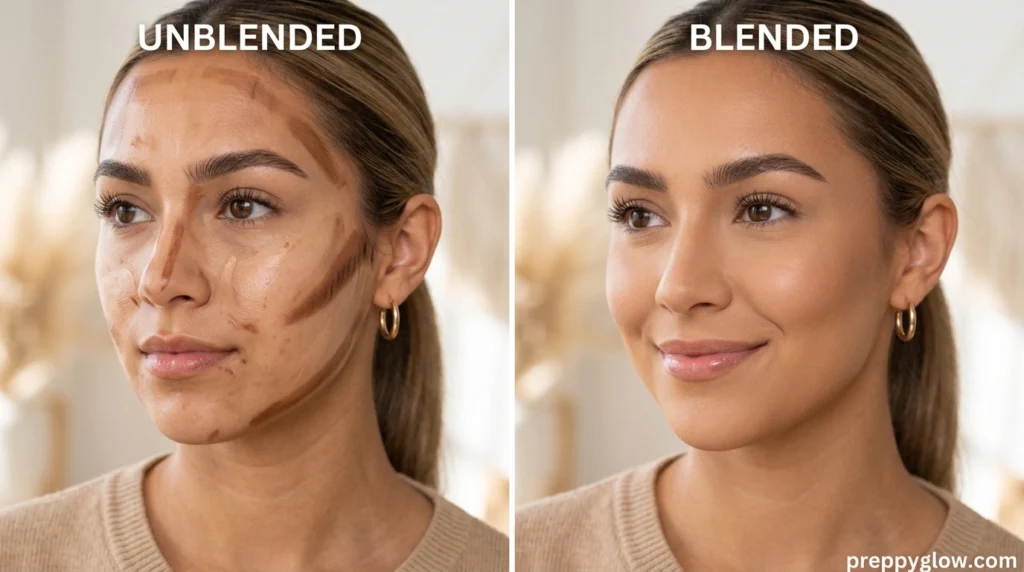
2. Shadow-and-light placement. Contour mimics shadow, highlighter mimics light, and blush mimics natural flush — and all three should follow face shape, not a single universal map.
3. Blending transitions. The difference between a muddy eye look and a soft, professional one almost always comes down to blending between color transitions, not the shades chosen.
| Technique | What It Fixes | Skill Level | Time Added |
|---|---|---|---|
| Undertone matching | Ashy or orange-toned foundation | Beginner | 2–3 min |
| Contour placement | Flat-looking face structure | Intermediate | 3–5 min |
| Blush placement | Lack of natural flush/dimension | Beginner | 1–2 min |
| Highlighter placement | Dull, flat-looking skin | Beginner | 1–2 min |
| Blending eye transitions | Muddy or harsh eyeshadow | Intermediate | 3–7 min |
Skin Type, Undertone & Finish: The Foundation Decision
The most common makeup complaint — “it looks cakey by noon” — is almost always a mismatch between finish and skin type, not a bad product.
By skin type:
- Oily skin does best with oil-free, mattifying formulas, translucent setting powder in the T-zone, and a lightweight setting spray.
- Dry skin needs hydrating, cream or liquid-based formulas, minimal powder, and dewy or satin finishes rather than matte.
- Combination skin often needs two strategies in one face — mattifying where oil builds up, hydrating everywhere else.
- Sensitive skin does best with fragrance-free, dermatologist-tested formulas and mineral-based sunscreen underneath.
Between tinted moisturizer, BB cream, and full-coverage foundation, the right choice depends on coverage need, not trend:
| Product | Coverage Level | Best For | Added Skincare Benefit |
|---|---|---|---|
| Tinted moisturizer | Sheer | Low-maintenance, oily-but-sensitive skin | Hydration |
| BB cream | Light–medium | Combination skin, everyday wear | SPF + hydration (varies by product) |
| Foundation | Medium–full | Uneven tone, texture, special occasions | Depends on formula |
Setting the base correctly matters just as much as choosing it. A light dusting of powder on oil-prone zones, followed by a setting spray, locks the base without the over-powdered, cakey look that comes from applying too much powder over too little hydration.
How Do You Choose Makeup Techniques for Your Face Shape and Skin Type?
Short answer: match the technique to your structure and skin behavior first, and the product choice second.
For face shape:
- Round or square faces generally benefit from contour along the cheekbone hollows and jaw, with blush swept upward toward the temples for lift.
- Heart-shaped faces do well with blush applied straight across the apples of the cheeks for a natural, youthful flush.
- Longer faces benefit from horizontal blush placement rather than upward strokes, which can elongate the face further.
For eye shape:
- Hooded and monolid eyes generally see better results applying shadow with eyes open (to judge visibility accurately) and using cream or long-wear formulas that resist creasing.
For skin type:
- Oily skin holds up better with powder-based color products; dry skin holds up better with cream-based ones.
For skill level:
- Beginners get more consistent results starting with cream products (blush, bronzer) that are harder to apply unevenly than powder.
Each of these decisions compounds — face shape informs placement, skin type informs formula, and skill level informs which formula is easiest to control.
Building Pro-Level Techniques Step by Step
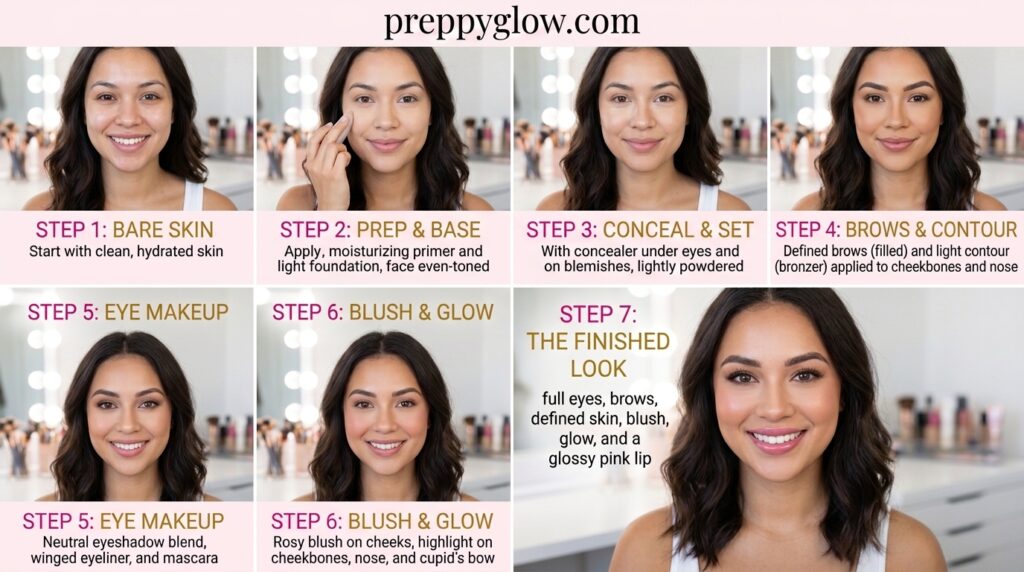
Most “professional-looking” makeup comes down to a repeatable sequence rather than talent alone. Here’s the core order that holds up across skill levels:
- Prep skin first. Moisturizer and sunscreen go on before any color product — skipping this is the top cause of patchy, cakey makeup later in the day.
- Color-correct only where needed. Peach or salmon-toned concealer counteracts dark circles; green counteracts redness. Skip this step if you don’t have visible discoloration.
- Build base coverage in thin layers. Two light layers of foundation blend more evenly than one heavy layer.
- Set strategically, not everywhere. Powder only where oil builds up — over-setting dry areas causes flaking.
- Add dimension with contour, blush and highlighter, following your face shape rather than a universal map.
- Layer eye color from light to dark, blending between each layer before adding the next.
- Finish with a setting spray to merge all layers and extend wear time.
Following this order — rather than the products used — is what separates a polished result from a rushed one.
Is Glow Beauty Lab’s Approach Actually Reliable?
A fair question, since beauty content online is inconsistent at best. Here’s what sets a technique-first approach apart from trend-chasing beauty content:
- It’s based on skin type and face structure, which don’t change with trends.
- It draws on principles commonly taught by licensed estheticians and professional makeup artists, not just influencer trial-and-error.
- It sets realistic expectations rather than promising instant, dramatic transformation.
Pros and cons of a technique-first approach:
| Pros | Cons |
|---|---|
| Adapts to any product budget | Requires more upfront learning than “just buy this” content |
| Results transfer across new product launches | Takes longer to master than following a single tutorial |
| Reduces wasted product purchases | Less instantly satisfying than a quick trend video |
No technique replaces basic skin health — sunscreen, cleansing, and hydration still matter more long-term than any makeup step. Glow Beauty Lab treats makeup as an addition to skin health, not a replacement for it.
Tools & Pro Habits: Building a Kit That Actually Works
Technique only gets you so far without the right tools behind it — and just as importantly, without overbuying tools you’ll never use.
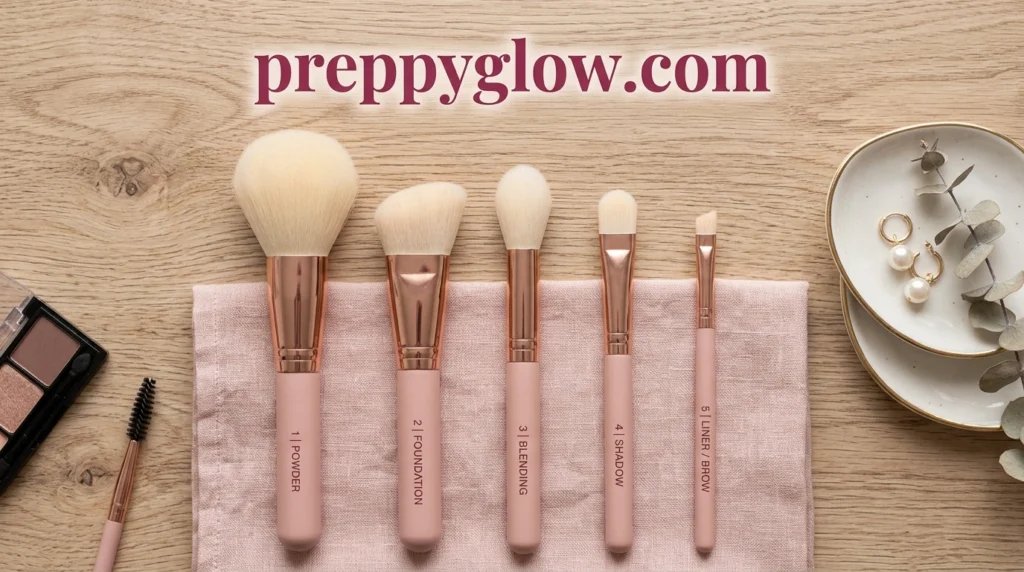
A functional starter kit needs five tools, not fifteen:
- A foundation brush or blending sponge for base application
- A fluffy powder brush for setting and bronzer
- An angled brush for brows or liner precision
- A blending brush for eyeshadow crease work
- A small, dense brush for concealer placement
Bristle type matters more than most people realize. Synthetic bristles work best with cream and liquid products because they don’t absorb product the way natural fibers do — meaning less product waste and more even application. Natural bristles, by contrast, pick up and diffuse powder more efficiently, which is why most professional powder brushes are still natural-hair blends.
Building a full collection on a budget is a sequencing problem, not a spending problem. The biggest mistake beginners make is buying color products (multiple eyeshadow palettes, several blushes) before they own a functional base. A smarter build order looks like this:
- Base first — foundation or tinted moisturizer, concealer, setting powder
- Definition second — a brow product, mascara, one versatile eyeshadow palette
- Color last — blush, contour, lip products
Following that order means every purchase compounds into a usable routine instead of sitting in a drawer unused. It also naturally slows down spending, since each stage takes time to actually use up before the next one feels necessary.
Beauty Tech: Gua Sha, Jade Rollers & LED Light Therapy
Beyond makeup application, a growing category of at-home tools sits in the pre- and post-makeup routine — and the two most searched are often confused for interchangeable options when they’re not.
Gua sha uses a flat-edged tool and firm, upward strokes to temporarily de-puff and sculpt the face by encouraging lymphatic drainage. Results are visible almost immediately but fade within hours, which is why it’s most often used as a pre-makeup step rather than a long-term treatment on its own.
Jade rollers use a rolling motion that’s gentler than gua sha and better suited to daily use. The cooling sensation of the stone also helps calm inflamed or puffy skin, making it a lower-effort, more relaxing habit rather than a sculpting tool.
LED light therapy works on an entirely different mechanism. Specific wavelengths — commonly red for collagen stimulation and blue for acne-causing bacteria — penetrate the skin to trigger a cellular response over weeks of consistent use, not instantly like a gua sha session. At-home LED devices are generally lower-strength than in-office treatments, so results depend heavily on regular, consistent use rather than a single session.
| Tool | Mechanism | Result Speed | Best Use Case |
|---|---|---|---|
| Gua sha | Manual lymphatic drainage | Immediate, temporary | Pre-makeup de-puffing |
| Jade roller | Gentle rolling, cooling | Immediate, mild, temporary | Daily calming ritual |
| LED light therapy | Light-triggered cellular response | Gradual, over weeks | Long-term collagen/acne support |
None of these tools replace core skincare — sunscreen, cleansing, and hydration remain the foundation these tools build on top of, not a substitute for them.
Makeup Removal: Protecting Skin Barrier Health
How makeup comes off matters just as much as how it goes on, and it’s the step most routines shortcut. Rubbing or pulling at the skin to remove waterproof mascara or long-wear foundation causes more fine lines and irritation over time than the makeup itself ever would.
A proper double-cleanse removes product without the friction that damages skin:
- First cleanse with an oil-based or micellar formula to break down makeup, sunscreen and sebum
- Second cleanse with a gentle water-based cleanser to clear any remaining residue
- Pat — don’t rub — the skin dry immediately after
Skipping this two-step process, or removing makeup with a dry wipe alone, is one of the most common causes of clogged pores and premature under-eye fine lines. For anyone wearing SPF daily, a proper double-cleanse is arguably as important as the application steps covered earlier in this guide — the base only stays healthy if it’s removed as carefully as it was applied.
Frequently Asked Questions
What is Glow Beauty Lab actually for? It’s a technique-first makeup and beauty tools hub — the goal is teaching the skill behind a look, not just listing products.
Do I need expensive tools to get pro-level results? No. A five-piece brush kit and correctly matched, budget-friendly base products outperform an expensive kit used with the wrong technique.
How often should I replace makeup brushes? Most synthetic brushes last 2–3 years with regular cleaning; natural-hair brushes can last longer but need more careful washing to avoid shedding.
Is LED light therapy safe to use with makeup on? No — LED devices work best on clean, product-free skin, since makeup and skincare layers can block light penetration.
About This Guide
This guide is reviewed under PreppyGlow’s editorial standards for beauty content, which prioritize technique accuracy over trend coverage. Content is developed using widely accepted guidance from licensed estheticians and professional makeup artistry practices, cross-checked against general dermatological consensus on skin type, sun protection and product formulation.
Reviewed by: Ava Bennett, Licensed Esthetician & Beauty Content Editor, with over 8 years of hands-on experience in skincare-adjacent makeup application and beauty education.
PreppyGlow’s editorial mission is straightforward: give readers technique-based guidance they can actually apply, without overselling products or promising results that depend on genetics, budget, or unrealistic time investment. Where claims involve skin health (SPF, skin type reactions, sensitivity), we default to conservative, general dermatological consensus rather than trend-driven claims.
This page was last updated in 2026 and will continue to be reviewed as techniques and tools evolve, particularly as new formulas, tools and at-home devices enter the market and existing recommendations need re-checking against current best practice.
Conclusion
Preppyglow“s Glow Beauty Lab exists to connect three things that are usually taught separately: your skin and face shape, the right makeup techniques, and the tools that make those techniques repeatable. Whether you’re matching foundation to undertone, learning contour placement, or deciding between lash extensions and a lash serum, the same principle holds — match the method to your face, not the other way around.
From here, explore the individual technique guides linked throughout Glow Beauty Lab — from face-shape contouring to eye shape-specific tutorials — to go deeper on any single step covered above. Glow Beauty Lab will keep expanding as techniques, tools and formulas evolve, so check back for updates.
